This sourdough pierogi dough recipe puts discard (or active starter) to good use to make soft, chewy pierogies! Instead of sour cream, we add sourdough to the dough to get the familiar tanginess that these traditional Polish dumplings are loved for. Add your favorite sweet or savory filling!

When you have an abundance of sourdough discard, at a certain point you start thinking about new ways to use it. Homemade pierogies are perfect.
This dough has a lovely sourdough tanginess, and cooks up into deliciously soft, chewy dumplings. After blanching, I like to pan-sear them in butter to crisp the outside and add another dimension of flavor and texture. And you can stuff them with any sweet or savory fillings you like!
Why This Recipe is a Winner
- Simple pantry staple ingredients and an easy method – You probably already have everything on hand to make this recipe right now! And the method couldn’t be easier, no stand mixer or special pasta maker required.
- Fill them sweet or savory – Savory or sweet tooth, this fresh dumpling dough makes delicious pirogies!
- Freezer friendly and great for meal prep – You can freeze pierogies for up to 3 months, and when you want to eat them, just pop them (still frozen) into boiling water and cook for 4 to 5 minutes. How’s that for fast food?! Tip: Make a double batch! It doesn’t take that much longer if you’re already making this recipe, and you can freeze leftovers for easy meal prep dinners.
Sourdough Discard Pierogi Dough Ingredients
INGREDIENTS EXPLAINED
Here the ingredients are explained and applicable substitutions are given. For the full recipe (with ingredient amounts), please see the recipe card below.
- Flour – In this discard recipe, we use regular all-purpose flour.
- Baking powder – To lighten up the dough just a bit.
- Coarse kosher salt – This seasons the dough so our pierogies aren’t bland. You can use fine table salt, just use a little less.
- Butter – Adds a touch of richness to the dough.
- Sourdough discard – Use 100% hydration sourdough discard (unfed sourdough starter) that’s 6 days old or less (chilled straight from the fridge is fine).
- Egg – Egg adds a bit of richness as well as elasticity, which makes the dough easier to work with and helps prevent tearing.
How to Make This Sourdough Pierogi Dough Recipe: Step-by-Step Instructions
- Make the dough. Add the flour, baking powder, and salt to a large bowl and whisk to combine. Cut the butter into the dry ingredients until it’s coarsely incorporated, and there are some pieces the size of peas. Make a well in the center and add the discard and egg. Use a fork to mix the wet ingredients into the flour mixture, switching to your hands when it starts to form a shaggy dough.
- Knead. Knead the dough by hand until it’s smooth and elastic, about 5 minutes, adding up to 3 tablespoons more flour as needed.
- Bulk ferment. Shape the dough into a disk, wrap with plastic wrap, and refrigerate for at least 4 (but up to 24) hours.
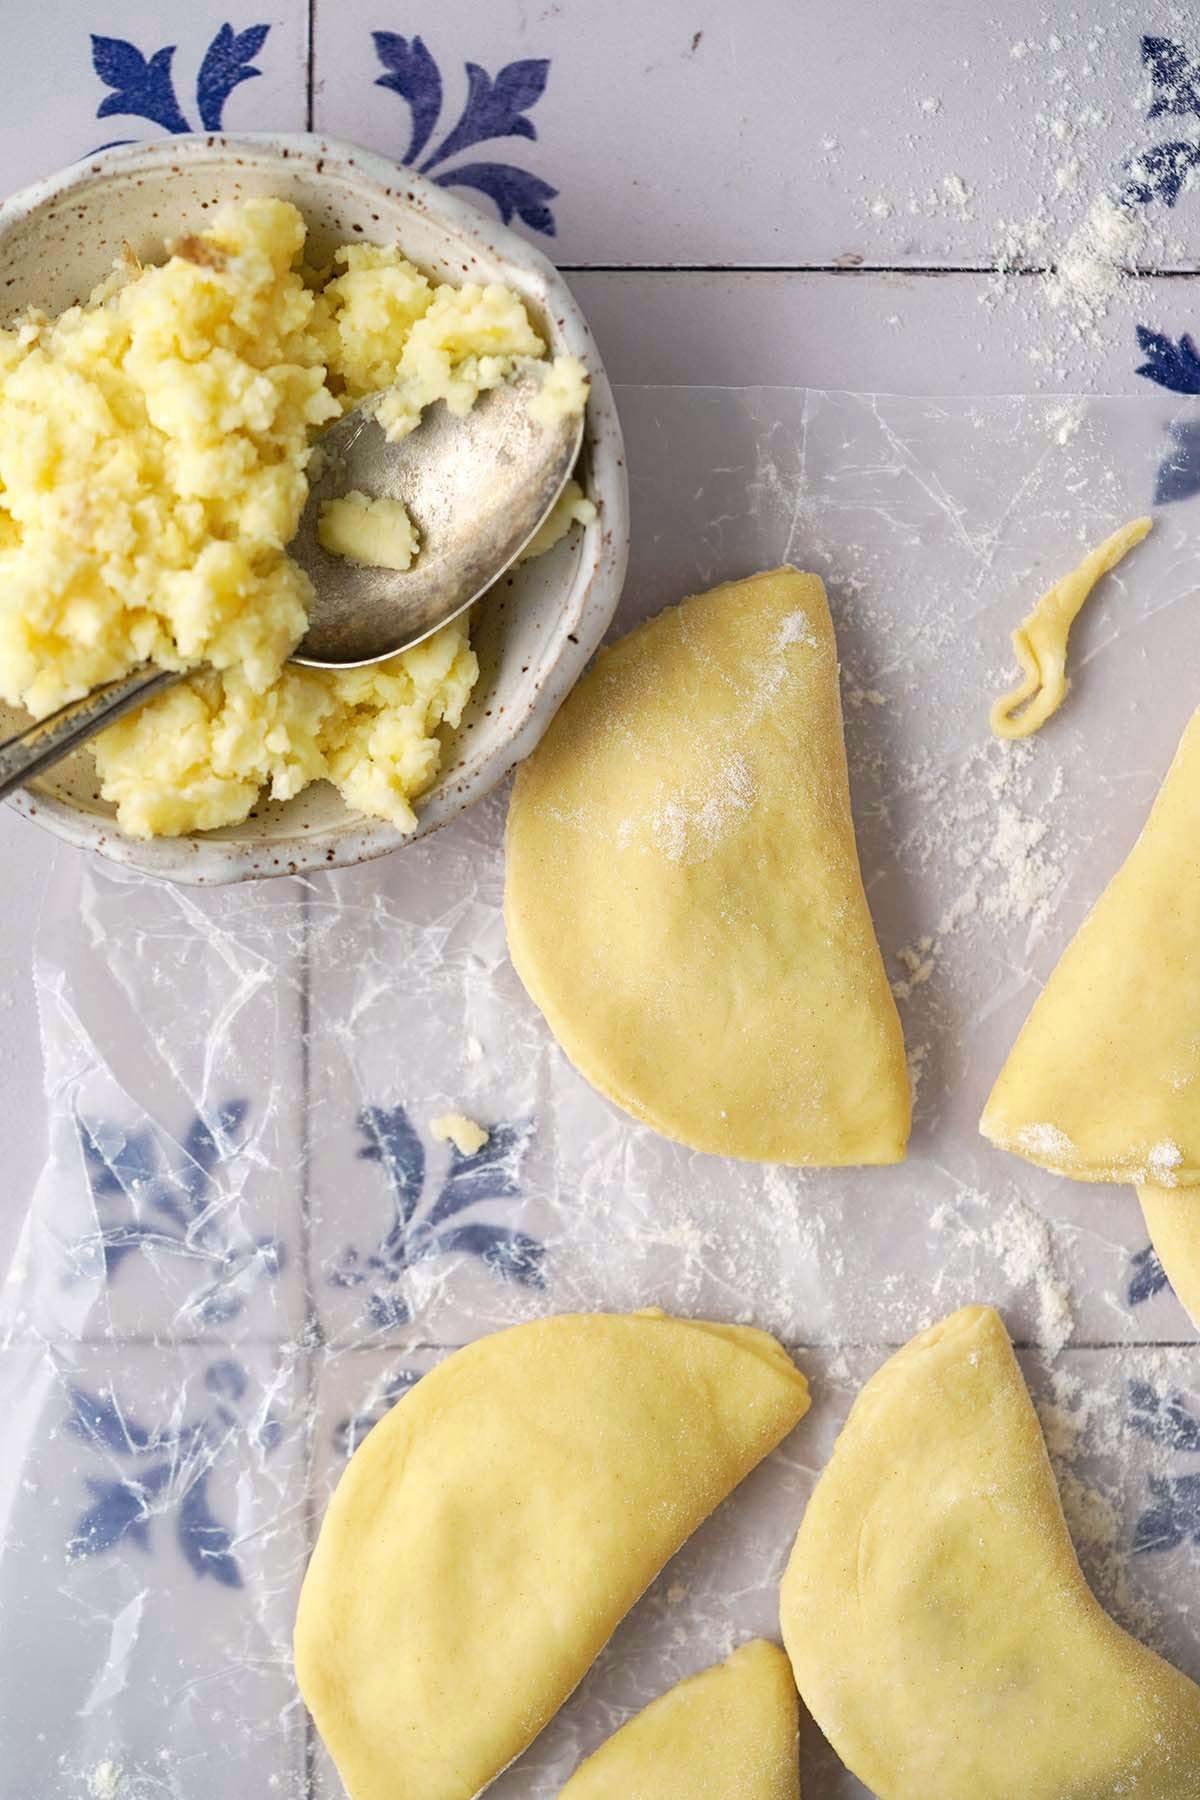
- Roll out the dough, stamp it into circles, and fill the pirogies. Roll the dough out to a thickness of 1/8-inch. Use a cookie cutter, biscuit cutter, glass, or bowl to stamp out circles (3 1/4-inch circles work well and hold about 1 tablespoon filling each). Add the filling of your choice to each, and then to help seal them, dip your finger in water, run it around half of the circle, and fold the other half over the moistened side, pressing to seal. Gather any dough scrapes, roll them out again, and repeat until you run out of dough or filling.
- To cook and eat the pierogies now, let them rest for 30 minutes in the fridge. Bring a pot of water to a boil, season it with salt, and cook the pierogies until they float (about 3 minutes). Drain, and then enjoy them with your favorite toppings, or pan-sear them with a little butter or oil to crisp up the outside.
Storage
Homemade pierogies store really well in the fridge or freezer, which makes them perfect for meal prep.
In the Fridge
Once the dough is made, you can keep it wrapped in the fridge for up to 3 days before rolling it out and filling the pierogis. Just note that the fermentation process will continue, and you’ll be able to taste the sourdough more the longer it ferments.
Storing Blanched Pierogis
Another option is to stuff the pierogis with whatever filling you want, and then blanch them. (Blanching means to cook them in salted boiling water until they float, which takes about 3 minutes for fresh pierogis.) After blanching, drain them well. Cooking stops the fermentation process, and you can store blanched pierogis in the fridge for up to 3 days or in the freezer for up to 3 months.
Freezing Uncooked Pierogis
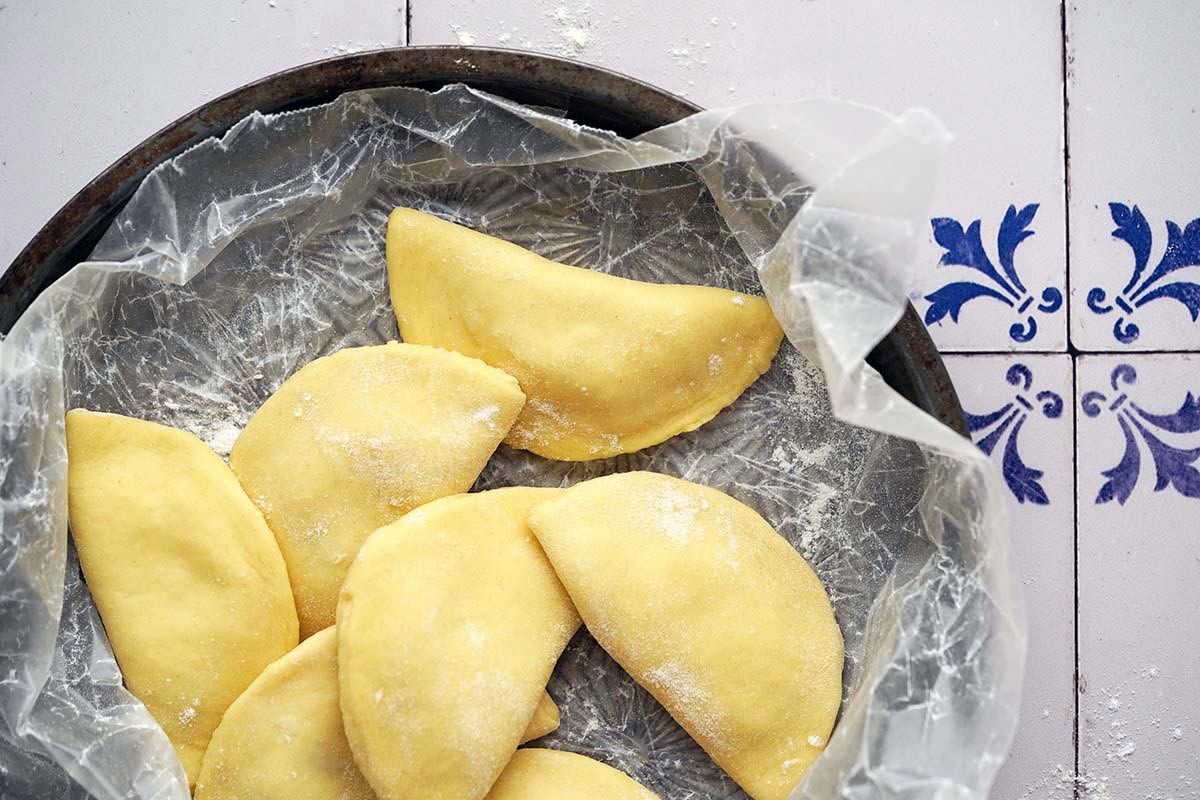
My favorite way to store pierogis is frozen. To do so, after they’re filled, dust the outside with a little flour and spread them out evenly so they aren’t touching on a parchment paper-lined baking tray. Freeze until they’re solid, about 3 hours. After that, transfer the pierogis to a freezer-safe zip-top plastic bag, label with the date and contents, and freeze for up to 3 months.
To heat pierogis from frozen, bring a pot of salted water to a boil. Add the frozen pierogies and cook until they float, about 4 to 5 minutes.
Expert Tips For the Best Sourdough Pierogi Dough Recipe
- Get the thickness right – There’s a sweet spot when it comes to how thick you should roll out pierogi dough. About 1/8-inch is perfect; it’s thick enough to avoid tearing, but thin enough to let the flavor of the filling shine.
- Let them rest after filling before cooking – After you’ve rolled out the dough and filled the pierogies, let them chill for 30 minutes in the fridge before blanching. This helps them stay sealed and reduces the risk of the filling leaking out while cooking.
Pierogi Filling Ideas
The sky is the limit when it comes to what you can stuff these dumplings with! This dough works beautifully with both sweet and savory fillings. Here are a few ideas to get you started:
- Mashed potatoes
- Cheesy mashed potatoes (known as pierogi ruskie)
- Sautéed cabbage
- Sautéed mushrooms
- Sauerkraut
- Cooked meat, such as beef, turkey, or chicken
- Farmer’s cheese (called twaróg in Polish); you can sweeten the cheese filling with a little bit of sugar and serve it topped with fresh berries, but my favorite is savory farmer’s cheese filling served topped with butter, sour cream, and chives or scallions
- Fresh berries or pie filling (topped with a sprinkle of sugar and a dollop of whipped cream)
Pro Tip: Turn Leftover Mashed Potatoes Into a Delicious Perogy Filling
If you have leftover mashed potatoes stashed in your fridge, they’re easy to make into the perfect cheesy pirogi filling! To do so, add 1 tablespoon butter to a small skillet over medium-low heat. Once hot, add 1 large clove of crushed garlic and cook until fragrant, about 1 minute, stirring constantly. Add the garlic butter to a large bowl along with 1 cup of seasoned leftover mashed potatoes and 2 ounces of shredded sharp cheddar cheese, and stir to combine.

Pierogi Dough Recipe FAQs
No. Polish perogies, Italian ravioli, and Asian dumplings are all similar but not quite the same.
Not only do they originate in different regions of the world, but their dough ingredients and fillings are also unique.
Additionally, their shapes vary, with pierogis being half-moon or crescent-shaped, ravioli being round or square-shaped, and Asian dumplings commonly being purse-shaped or crescent-shaped and sometimes pleated.
Yes! If you run out of pierogi filling but you still have more dough, you can freeze it for later. To do so, wrap the dough well in plastic wrap, then in aluminum foil, and lastly put it into a freezer-safe zip-top plastic bag. Label the bag with the date and contents, and freeze for up to 3 months.
Thaw the dough in the fridge overnight, or at room temperature for about 2 hours. If the dough is sticky after thawing, you can knead a bit of flour and then roll it out as normal.
Did You Make This recipe?
⭐️⭐️⭐️⭐️⭐️
Please leave a comment and star rating to let me know how it turned out. Thank you for your feedback and support!

Sourdough Discard Pierogi Dough Recipe
Email This Recipe
Get this recipe link emailed straight to your inbox!
Ingredients
- 1 cup all-purpose flour, plus more for kneading and rolling out
- 1 teaspoon baking powder
- 1/2 teaspoon coarse kosher salt
- 2 tablespoons unsalted butter, chilled and diced
- 1/2 cup sourdough discard, unfed sourdough starter; 100% hydration; 6 days old or less
- 1 large egg
Instructions
- Make the dough. Add the flour, baking powder, and salt to a large bowl and whisk to combine. Cut the butter into the dry ingredients until it’s coarsely incorporated, and there are some pieces the size of peas. Make a well in the center and add the discard and egg. Use a fork to mix the wet ingredients into the flour mixture, switching to your hands when it starts to form a shaggy dough.
- Knead. Knead the dough by hand until it’s smooth and elastic, about 5 minutes, adding up to 3 tablespoons more flour as needed.
- Bulk ferment. Shape the dough into a disk, wrap with plastic wrap, and refrigerate for at least 4 (but up to 24) hours.
- Roll out the dough, stamp it into circles, and fill the pirogies. Roll the dough out to a thickness of 1/8-inch. Use a cookie cutter, biscuit cutter, glass, or bowl to stamp out circles (3 1/4-inch circles work well and hold about 1 tablespoon filling each). Add the filling of your choice to each, and then to help seal them, dip your finger in water, run it around half of the circle, and fold the other half over the moistened side, pressing to seal. Gather any dough scrapes, roll them out again, and repeat until you run out of dough or filling.
- To cook and eat the pierogies now, let them rest for 30 minutes in the fridge. Bring a pot of water to a boil, season it with salt, and cook the pierogies until they float (about 3 minutes). Drain, and then enjoy them with your favorite toppings, or pan-sear them with a little butter or oil to crisp up the outside.
Notes
- Storing the Dough: Once the dough is made, you can keep it wrapped in the fridge for up to 3 days before rolling it out and filling the pierogis. Just note that the fermentation process will continue, and you’ll be able to taste the sourdough more the longer it ferments.
- Storing Blanched Pierogies: Another option is to stuff the pierogis with whatever filling you want, and then blanch them. (Blanching means to cook them in salted boiling water until they float, which takes about 3 minutes for fresh pierogis.) After blanching, drain them well. Cooking stops the fermentation process, and you can store blanched pierogis in the fridge for up to 3 days or in the freezer for up to 3 months.
- Freezing Uncooked Pierogies: My favorite way to store pierogis is frozen. To do so, after they’re filled, dust the outside with a little flour and spread them out evenly so they aren’t touching on a parchment paper-lined baking tray. Freeze until they’re solid, about 3 hours. After that, transfer the pierogis to a freezer-safe zip-top plastic bag, label with the date and contents, and freeze for up to 3 months. To heat pierogis from frozen, bring a pot of salted water to a boil. Add the frozen pierogies and cook until they float, about 4 to 5 minutes.
- Garlicky Cheesy Mashed Potato Filling: You can use whatever your favorite pierogi filling is. One of my favorites is an easy filling using leftover mashed potatoes. To make it, add 1 tablespoon butter to a small skillet over medium-low heat. Once hot, add 1 large clove of crushed garlic, and cook until fragrant, about 1 minute, stirring constantly. Add the garlic butter to a large bowl along with 1 cup of seasoned leftover mashed potatoes and 2 ounces of shredded sharp cheddar cheese, and stir to combine.
Nutrition