
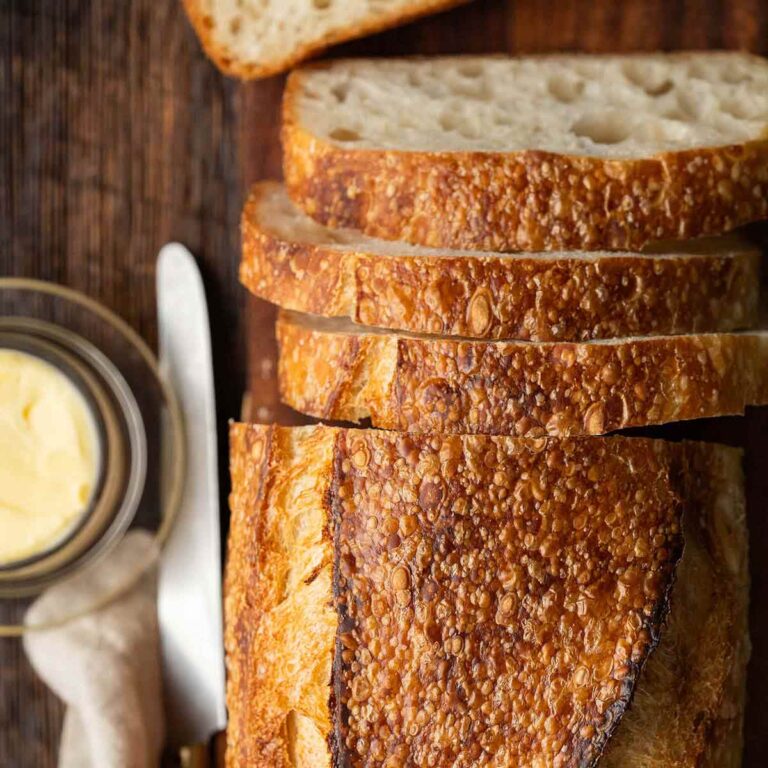
This sourdough ciabatta bread roll recipe yields bakery-quality buns with an open, chewy crumb and crisp, golden crust. All you need is your sourdough starter, flour, water, and salt!

Sourdough ciabatta rolls combine what we love about both ciabatta and sourdough. A crispy crust with a chewy interior and an open crumb that’s classic of ciabatta, plus tangy, complex sourdough flavor. Heaven.
Whether you’re using them for sandwiches, dunking them in soup, or enjoying them warm with olive oil, these crusty artisan sourdough rolls are sure to become a favorite in your baking rotation.
What Is Ciabatta Bread?
Ciabatta is an Italian bread known for its flat shape, crispy crust, and airy crumb. It literally means “slipper” in Italian because these rolls look like little bread slippers! When made with sourdough, ciabatta takes on even more flavor and character.
Traditional ciabatta recipes (and ciabatta roll recipes) use commercial yeast, but the sourdough version is leavened naturally for better digestibility and rich, tangy flavor.
How Is Making Ciabatta Rolls Different Than Making Other Kinds of Sourdough Bread?
Making sourdough ciabatta rolls is a bit different from other types of sourdough bread due to their unique texture, shape, and hydration level. Here are the main differences:
Higher Hydration Dough
Ciabatta dough is typically very wet and sticky due to a higher ratio of water to flour. This high hydration is important for creating that open, airy crumb with lots of beautiful holes. In contrast, traditional sourdough loaves like boules or batard frequently have lower hydration, making the dough easier to shape and score.
This recipe is the best of both worlds. To put it in bakers percentages, we use about 67% water and about 25% sourdough starter. Compared with high hydration breads (which typically have an 80% water-to-flour ratio), this dough is relatively easy to work with (and it’s definitely beginner-friendly). Although our hydration isn’t super high, the higher level of starter means we still get a gorgeous open airy crumb on our crusty rolls!
Long Bulk Fermentation, Short Final Proof
Like other sourdoughs, ciabatta rolls require a long bulk fermentation to develop flavor and structure. In this recipe, we allow the dough to first ferment at room temperature and then ferment in the fridge before shaping. However, the final proof for sourdough ciabatta buns is usually shorter, and there’s less handling to retain air pockets.
Minimal Shaping
Ciabatta rolls are shaped much more gently with no tight shaping or surface tension building. The dough is usually poured or scooped out, then cut into rectangular portions and left somewhat rustic for artisanal rolls. Other sourdough breads often involve careful shaping to encourage rise and oven spring.
Baking Method
Unlike many other sourdough breads, ciabatta roll dough isn’t usually scored before baking. We want rustic crusty ciabatta!

Example Bakers Schedule for Sourdough Ciabatta Rolls
Use this as a general timeframe, but note that exact times can vary.
Day 1
- 11pm: Feed your starter.
Tip: It doesn’t have to be 11pm exactly, just feed it right before you go to bed.
Day 2
- 7am (the next morning): Mix the dough.
- 7:30am-9:30am: Perform 4 sets of stretch and folds spaced 30 minutes apart.
- 9:30am-4:30pm: Bulk ferment at room temperature.
- 4:30pm-4:30pm (the next day): Bulk ferment in the fridge for 12-24 hours.
Day 3
- 4:30pm: Shape.
- 4:40pm-6:10pm: Proof at room temperature.
- 5:10pm: Preheat oven.
- 6:10pm-6:30pm: Bake.
- 6:45pm: Slice and enjoy!
Ingredients
INGREDIENTS EXPLAINED
Here the ingredients are explained and applicable substitutions are given. For the full recipe (with ingredient amounts), please see the recipe card below.
Ingredients To Feed Your Starter:
- Sourdough starter – Use mature, 100% hydration sourdough starter.
- Unbleached all-purpose flour – Use organic if possible, but definitely unbleached flour (all-purpose is fine).
- Non-chlorinated water – I use bottled spring water because the drinking water where I live is sometimes highly chlorinated.
Dough Ingredients:
- Ripe sourdough starter – Once your starter is fed, you’ll want to use it when it’s around its peak. I usually feed it around 10-11pm the night before I want to bake, and then I mix up my dough around 7-8am the next morning.
- Non-chlorinated water – I use bottled spring water at room temperature. However, it can be slightly warm to encourage fermentation (not hotter than 95 to 100F).
- Fine sea salt – To make sure our bread isn’t bland, and to help control the rise.
- Unbleached bread flour – With its higher protein content than all-purpose flour, bread flour lends a deliciously chewy texture to this loaf.
How to Make This Sourdough Ciabatta Bread Roll Recipe: Step-by-Step Instructions
If you’re a visual learner, for step-by-step photos and a video of making a similar sourdough bread, please see this sandwich bread recipe.
Step 1: Feed Your Starter (4 to 12 hours wait time)
Feed your starter so that it’s at peak when you’re planning to make the dough. Around 4 to 12 hours before you want to make the dough is the general timeframe, but you know how long it takes your starter to reach peak after a feeding, so go with that.
To feed your starter, mix all ingredients together in a clean jar. Cover loosely and let it rest at room temperature until it peaks. This usually takes about 4 to 12 hours; I like to do this the night before I want to make the dough, right before I go to bed.
Step 2: Make the Dough (30 minutes wait time)
- Add the active starter, water, and salt to a large bowl or container (glass or clear so you can see through the sides and bottom) and whisk to combine (it doesn’t have to be fully integrated, but it should look milky). Add the flour and stir to form a shaggy dough (don’t knead it; some dry spots are fine).
- Cover the container and let it sit at room temperature for 30 minutes.
Step 3: Perform the Stretch and Folds (90 minutes wait time)
- Wet your hands and perform your first set of stretch and folds. To do so, grab a piece of dough, gently stretch it up, fold it over, and then rotate the bowl 1/4 turn. Repeat this process 3 more times until you come to the point where you started. Cover the bowl and let the dough rest at room temperature for 30 minutes.
- After 30 minutes, repeat the stretch and fold process. Cover the bowl and let the dough rest at room temperature for another 30 minutes. Repeat this process 2 more times, for a total of 4 sets of stretch and folds spaced 30 minutes apart.
Step 4: First Rise/Complete Bulk Fermentation (6 hours wait time at room temperature, and then 12 to 24 hours in the fridge)
After the 4th set of stretch and folds, cover the bowl and let the dough rest at room temperature until puffed, about 6 hours. At this point, pop the dough into the fridge for 12 to 24 hours more.
At the end of this step, the dough should be puffed to about 50-75% larger than its original size; the top of the dough should be slightly domed and bubbly; additionally, the bottom of the dough should look spongy.
Step 5: Shape
Lightly brush a half sheet pan with olive oil. Flour your hands and your work surface.
Tip the dough out onto the floured surface. With floured hands, pat it into a rough square shape. Use a bench scraper to cut the dough into 6 equal portions, trying not to deflate the air pockets if possible.
Step 6: Proof (90 minutes wait time)
Transfer the dough to the prepared tray, evenly spacing the rolls apart. Cover loosely with plastic wrap and let the dough sit to proof until slightly puffed, about 90 minutes at room temperature.
Step 7: Preheat and Bake
- While the dough proofs, preheat the oven to 450F. We want it nice and hot, so let it heat up for at least 45 minutes to 1 hour.
- Boil a kettle of water. Add a couple inches of boiling water to small casserole dish that’s safe for oven temperatures of 450F.
- Remove the plastic wrap from the tray of dough, and bake the rolls. Put the dish of water on the oven rack next the trays of rolls to provide steam. Don’t open the oven while baking until the 20-minute mark to check if they’re done. The rolls are done when they’re puffed, golden on the bottom, and sound hollow when you tap the bottom, about 20 to 25 minutes.
- Cool for 10 to 15 minutes, then slice and enjoy.

Expert Tips For the Best Sourdough Ciabatta Rolls
1) Use a mature, ripe starter. Make sure your sourdough starter is active and bubbly before mixing the dough.
2) Hydration matters. High hydration gives ciabatta its open crumb and airy texture. If you’re new to higher hydration/wet doughs, expect it to be a bit sticky!
3) Minimal handling. Unlike making other kinds of sourdough breads, we don’t want to push out the air after bulk fermentation. Be gentle when shaping to keep the gas bubbles intact.
4) Baking with steam is key. It helps develop the signature crispy crust.
Storage
Store ciabatta buns in a paper bag at room temperature for 1 to 2 days or in the freezer for up to 3 months.
To reheat, pop a frozen roll into the microwave for 30 seconds, checking and adding 10-second intervals if necessary until it’s no longer frozen. After that, put it into a preheated 375F oven until the crust is crisp, about 5 minutes.

Frequently Asked Questions
Yes! You can substitute up to 20% of the bread flour with whole wheat. It’ll add a nuttier flavor and slightly denser texture.
Absolutely! Just shape the entire dough into one large loaf and increase the bake time to 35 to 40 minutes.
Yes, you can slice sourdough ciabatta buns and eat them warm—and they’re amazing that way! Unlike traditional sourdough loaves, which often benefit from cooling completely (to let the crumb set and prevent gumminess), ciabatta rolls are more forgiving. This is because:
Thin crust: Ciabatta rolls have a thinner crust than a boule or batard, so they don’t trap as much steam inside.
Open crumb: That light, airy interior cools faster and doesn’t get as gummy when sliced warm.
Smaller size: Because they’re smaller, they set up faster out of the oven.
Just let the rolls cool for 10 to 15 minutes after baking to set a bit, then slice them with a serrated knife, and enjoy!

Did You Make This recipe?
⭐️⭐️⭐️⭐️⭐️
Please leave a comment and star rating to let me know how it turned out. Thank you for your feedback and support!

Sourdough Ciabatta Rolls Recipe
Email This Recipe
Get this recipe link emailed straight to your inbox!
Ingredients
To Feed Your Starter:
- 40 grams sourdough starter
- 40 grams unbleached all-purpose flour
- 40 grams non-chlorinated water
Dough:
- 85 grams ripe sourdough starter, once it’s active and bubbly, weigh 85 grams of the fed starter
- 235 grams non-chlorinated water
- 8 grams fine sea salt
- 335 grams unbleached bread flour
- All-purpose flour, for shaping
- Olive oil, for the pan
Instructions
Feed Your Starter (4 to 12 hours wait time)
- Feed your starter so that it’s at peak when you’re planning to make the dough. Around 4 to 12 hours before you want to make the dough is the general timeframe, but you know how long it takes your starter to reach peak after a feeding, so go with that. To feed your starter, mix all ingredients together in a clean jar. Cover loosely and let it rest at room temperature until it peaks. This usually takes about 4 to 12 hours; I like to do this the night before I want to make the dough, right before I go to bed.
Make the Dough (30 minutes wait time)
- Add the active starter, water, and salt to a large bowl or container (glass or clear so you can see through the sides and bottom) and whisk to combine (it doesn’t have to be fully integrated, but it should look milky). Add the flour and stir to form a shaggy dough (don’t knead it; some dry spots are fine).
- Cover the container and let it sit at room temperature for 30 minutes.
Perform the Stretch and Folds (90 minutes wait time)
- Wet your hands and perform your first set of stretch and folds. To do so, grab a piece of dough, gently stretch it up, fold it over, and then rotate the bowl 1/4 turn. Repeat this process 3 more times until you come to the point where you started. Cover the bowl and let the dough rest at room temperature for 30 minutes.
- After 30 minutes, repeat the stretch and fold process. Cover the bowl and let the dough rest at room temperature for another 30 minutes. Repeat this process 2 more times, for a total of 4 sets of stretch and folds spaced 30 minutes apart.
First Rise/Complete Bulk Fermentation (6 hours wait time at room temperature, and then 12 to 24 hours in the fridge)
- After the 4th set of stretch and folds, cover the bowl and let the dough rest at room temperature until puffed, about 6 hours. At this point, pop the dough into the fridge for 12 to 24 hours more. At the end of this step, the dough should be puffed to about 50-75% larger than its original size; the top of the dough should be slightly domed and bubbly; additionally, the bottom of the dough should look spongy.
Shape
- Lightly brush a half sheet pan with olive oil. Flour your hands and your work surface.
- Tip the dough out onto the floured surface. With floured hands, pat it into a rough square shape. Use a bench scraper to cut the dough into 6 equal portions, trying not to deflate the air pockets if possible.
Proof (90 minutes wait time)
- Transfer the dough to the prepared tray, evenly spacing the rolls apart. Cover loosely with plastic wrap and let the dough sit to proof until slightly puffed, about 90 minutes at room temperature.
Preheat and Bake
- While the dough proofs, preheat the oven to 450F. We want it nice and hot, so let it heat up for at least 45 minutes to 1 hour.
- Boil a kettle of water. Add a couple inches of boiling water to small casserole dish that’s safe for oven temperatures of 450F.
- Remove the plastic wrap from the tray of dough, and bake the rolls. Put the dish of water on the oven rack next to the tray of rolls to provide steam. Don’t open the oven while baking until the 20-minute mark to check if they’re done. The rolls are done when they’re puffed, golden on the bottom, and sound hollow when you tap the bottom, about 20 to 25 minutes.
- Cool for 10 to 15 minutes, then slice and enjoy.
Notes
- Storage: Store ciabatta buns in a paper bag at room temperature for 1 to 2 days or in the freezer for up to 3 months.
- Reheating: To reheat, pop a frozen roll into the microwave for 30 seconds, checking and adding 10-second intervals if necessary until it’s no longer frozen. After that, put it into a preheated 375F oven until the crust is crisp, about 5 minutes.
Nutrition


I baked these today. It’s a long process but oohhhhh so worth it!!!
DELICIOUS 😋